Moodle - Assignment Grading With Marking Guide Rubric (staff/faculty)
- Jason 1keddie
- Zac Macdonald
Topics Covered In This Article
Overview
Marking guide is an advanced grading method that allows an instructor to create a set of criteria for a Moodle assignment activity, optionally share these criteria in advance with students, and grade each criterion using a range of values. To speed up instructor feedback, instructors may setup lists of frequently used comments that can be added to criteria feedback simply by clicking on them.
Benefits to using marking guide:
- Grading criteria transparency, assuming the marking guide form is provided to students with the assignment description
- Improved grading consistency
- Reduce time spent grading
- Shorten commenting time
Setting Up The Marking Guide
1. While in a Moodle assignment activity, under the Gear menu in the top right lick on Advanced grading.
/advanced-grading.png)
2. Set Change active grading method to to Marking guide.
/marking-guide.png)
3. Click the Define new grading form from scratch button.
/define-new-grading-form.png)
4. Enter in a Name and a Description for this Marking guide.
/name-marking-guide.png)
5. Enter in the following information for the criterion:
- Criterion name: Title for the criterion (e.g., Quality of references)
- Description for Students: Criterion description that students see along with their assignment description. This can be disabled below.
- Description for Markers: Criterion description that the grader will see. Note that the grader will also see the Description for Students, so if they are identical then it is safe to leave this blank.
- Maximum mark: The minimum grade is always zero, and Maximum mark defines the maximum grade.
Click Add criterion to add additional criteria.
/add-criterion.png)
6. Enter in any frequently used comments. Click Add frequently used comment to add additional comments.
/frequent-comments.png)
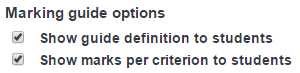
7. Set or unset the following options:
- Show guide definition to students: Determine whether students can see the marking guide criteria (criteria names, descriptions, and maximum marks) in the assignment.
- Show marks per criterion to students: Determine whether students can see the maximum marks for the criteria.
8. Click the Save button.
![]()
Using The Marking Guide - Grader View
To navigate to the marking guide to grade submissions, click on the assignment, click the View all submissions button, and click the grade button next to the student you wish to grade.
/grade.png)
1. While grading a submission with the marking guide, the grader will see the following.
In this example there is only one criterion, but five or more are usually recommended. Also, only description for students is being used here for the criterion description while description for graders, which would normally appear immediately underneath it, is blank.
The grader can:
- Optionally, type in a comment for each criterion.
- Optionally, click on the plus symbols under Frequently used comments to insert comments where the cursor is located.
- Enter a grade.
/grader-options.png)
2. The grader view also shows the following where the grader may:
- Turn on or off visibility of the grader and student criteria descriptions.
- See the current grade in the gradebook, if there is one.
- See which student is being graded out of how many.
- Leave a feedback comment that is intended for the submission as a whole.
- Optionally, notify students that their submissions have been graded. By default, students are notified by email.
/feedback-comments.png)
Using the Marking Guide - Student View
After students' submissions have been graded, students will see the following:
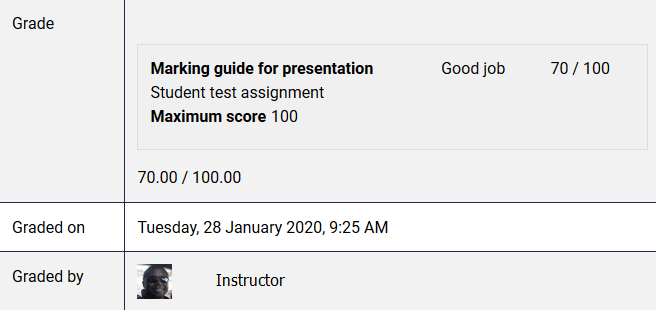
NOTE!: In the assignment, under Edit Settings > Grade > Grade Type, do not set the type to none or the student view will not show feedback or grades for each criteria. If an assignment is not graded, set it to Point or Scale and weight the assignment to zero.
Publishing A Marking Guide Form As A Template
Marking guides can be published as templates, making them available for use by anyone on the course site.
1. While in a Moodle assignment activity, under the Gear menu in the top right lick on Advanced grading.
2. Assuming there is a marking guide form already created and saved, click the Publish the form as a new template button. If you do not see this button then you will need to create and save your marking guide form first.
/publish-form-new-template.png)
Read the warning, and if you are comfortable with sharing your template with everyone click the Continue button.
/continue-confirmation.png)
Create New Marking Guide Form From Template
1. While in a Moodle assignment activity, under the Gear menu in the top right lick on Advanced grading.
Click the Create new grading form from a template button. Note that if you do not see this button then you'll need to delete your current form first by clicking the Delete the currently defined form button.
3. It will show your saved templates. If you'd like to search the saved templates from others, optionally enter in search criteria, and click the Search button.
![]()
4. At the bottom of each template are Use this template and Delete buttons. Click the Use this template button to select this template for your own use or click the Delete button if you'd like to permanently delete this template.

How to Contact the Computer Services Department
Submit a ticket
To submit a ticket, you will be required to log in using your FULL Royal Roads email address (detailed instructions here)
New! If you do not have a full RRU email address (students not currently in a credit program and/or visitors), you can create a portal account using your personal email address.
Email us at IT Customer Service
Contact Form
Phone: 250-391-2659 Toll Free: 1-866-808-5429
Come visit us in the Sequoia Building
Hours of Operation