Moodle My Media - How to create a voice-only recording (using Kaltura Capture)
- Jason 1keddie
- Anthony 1manning
- Zac Macdonald

Topics covered in this article
- Moodle My Media - How to create a voice-only recording (using Kaltura Capture)#Introduction
- How to record a voice-only audio recording
- How to embed audio
- How to access the audio files
- Moodle My Media - How to create a voice-only recording (using Kaltura Capture)#Troubleshooting
Introduction
A voice-only recording is an audio recording of you speaking. So both the screen and camera are turned off and are not recorded. Voice-only recordings may be useful for verbal feedback, concept explanations, podcasts, etc.
You can record a voice-only recording directly from your My Media page. To do this, you will need to install the My Media application called Kaltura Capture. Once you have made your recording, you can upload to your My Media library and embed it anywhere the Moodle text editor is available.
To learn how to make a voice-only recording, watch the video or read the step-by-step instructions below.
How to create a voice-only recording
1. Open Kaltura Capture
- From Moodle, click on My Media top right.

- From the My Media window, click on Add New and then Kaltura Capture.
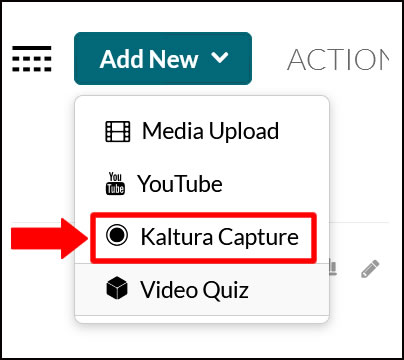
- If you’ve already installed Kaltura Capture, it will launch automatically. Otherwise, please refer to Moodle My Media - Installing Kaltura Capture.
2. Select only your Audio in the Kaltura Capture recorder
- In the Kaltura Capture recorder window, the Audio icon should be blue, showing it is enabled. If not enabled, select the Audio icon to turn it on.
- If a headset with a mic or external microphone has been connected, click the arrow to open the drop down menu. Select the correct headset with mic or microphone.
- Turn off and disable any screen and camera icons, they will look greyed out.
/kaltura-capture-mic-only.png)
- Then start recording. Press the RED CIRCLE RECORD button, a three-second countdown timer will indicate when recording will begin. To ensure that nothing is cut off from the beginning, it is a good idea to wait an extra second before you begin speaking.
/Kaltura-Capture-Countdown.png)
- You may pause and resume the recording by either clicking the Pause button or by pressing COMMAND or CTRL+SHIFT+R.
3. Click DONE to finish recording
- When you're finished with your recording click the SQUARE STOP button.
- If you would like to delete the recording and re-record it click the X button.
/Kaltura-Capture-stop-record.png)
- If you'd like to edit your recording please refer to Moodle My Media - How to edit video
- If want to save your recording select Yes, Stop it.
4. Name & save your recording
- Give your recording a title in the Title field.
- Optionally, you may add a description and tags.
- Clicking Save & Upload will upload the recording to My Media and save it in the Kaltura Capture library.
- Clicking Save will save it in the Kaltura Capture library where you can upload it to My Media later.
- Important Note: DELETE will remove it from your computer. It will not go into your Recycle Bin and can't be retrieved. Make sure you have either uploaded it into My Media or you would like it to be deleted. Deleting it from My Media will also remove it and can't be retrieved.
/Kaltura-Capture-Save-And-Upload.png)
- After uploading the recording to My Media, if you don't see the recording in your My Media library right away, try clicking the refresh button:

Kaltura Capture keyboard shortcuts
Refer to Moodle My Media - Kaltura Capture Keyboard Shortcuts for handy keyboard shortcuts, including how to record without the Kaltura Capture recorder appearing in your recording.
How to embed audio
- To embed your audio recording in Moodle, please see Moodle My Media - How to upload and share video & audio OR Moodle - How to record audio
How to access the audio files
To download an audio file in Moodle, please see Moodle My Media - How to download your video.
Troubleshooting
- For information on troubleshooting, please see Moodle My Media - Troubleshooting Kaltura Capture and My Media.

Content on this page is licensed under a Creative Commons Attribution-ShareAlike 4.0 International license.
How to Contact the Computer Services Department
Submit a ticket
To submit a ticket, you will be required to log in using your FULL Royal Roads email address (detailed instructions here)
New! If you do not have a full RRU email address (students not currently in a credit program and/or visitors), you can create a portal account using your personal email address.
Email us at IT Customer Service
Contact Form
Phone: 250-391-2659 Toll Free: 1-866-808-5429
Come visit us in the Sequoia Building
Hours of Operation