Moodle - Uploading images
- Jason 1keddie
- Zac Macdonald
- Lauren HalcombSmith (Deactivated)
Moodle allows you to upload and display images using the image button in the text editor. Moodle accepts .jpg, .png, .svg, .webp, and .gif image formats.
Topics Covered In This Article
Uploading an image
Uploaded images should have a file size under 200KB, unless the image needs to be particularly large and high quality (all images should be under 500KB). This will help Moodle display quickly for users, especially anyone with slower internet speeds. If needed, refer to the the Resizing an Image section to reduce the file size of the image before uploading.
Ensure that you have permission to use the image.There are many sites that allow you to search for free and royalty-free images. Here are a few examples: Unsplash, Pixabay, and Pexels.
Steps to upload an image
- With editing turned on, access the text editor where you want to display your image (e.g., in a page, forum post, etc.)
- Select the Insert image button in the text editor.
/moodle-add-image.png)
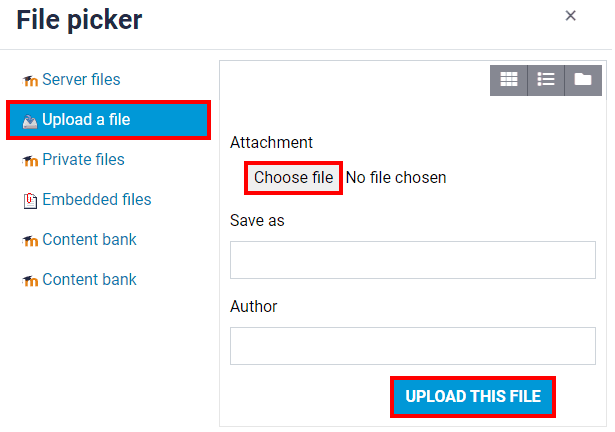
- Select the Browse repositories button.
/moodle-image-properties.png)
- Select Upload a file, select Choose File, navigate to your image and select Open, and then select Upload this file.
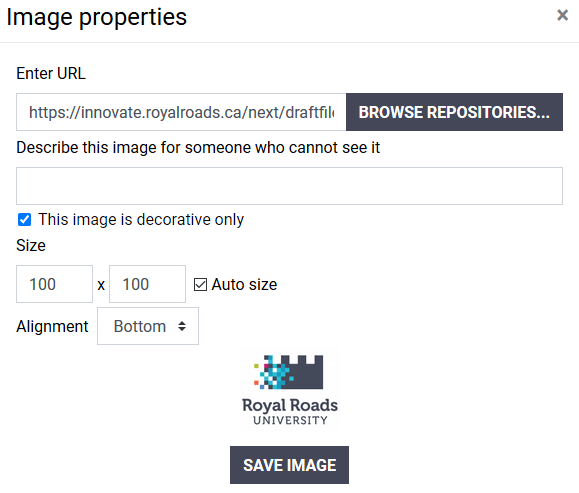
- Once you've selected Upload this file, you'll be taken to the Image properties window. If the image is decorative and is not intended to convey information select Description not necessary so that screen readers will know to skip over it. If the image is intended to convey information enter a description for the image for someone who cannot see it (more information on making images accessible here). To adjust the size of the image, enter the width (the number immediately under 'Size') and hit tab to let it automatically fill in the height. Auto size should be left enabled. When you're done, select Save image.
Resizing An Image
If an image is larger than it needs to be for the course site it is best to resize the image so that Moodle is able to display quickly for everyone. There are many programs on both Windows and Mac to achieve this. Windows comes with a program called Paint and Mac OS comes with a program called Preview. If you're not sure what to use, here are some simple instructors to resize an image using a free web-based tool:
- Navigate to photopea.com
- Drag your image file into Photopea, or select File from the top left and then Open, or if the image is in your clipboard simply use paste (Ctrl-v in Windows) to paste it in.
- Select File from the top left, select Export, and then select JPG (unless you know that your image is better suited to another format such as PNG).

- Set the width of the image. A width of 600 or 800 is usually a good size (this is just the file size width-you can have it display with a smaller width in Moodle). If it's a banner then try 1200. Once you click off of the width (or hit tab) it will automatically update the height.
- Optionally, change the filename that will be used when the image is saved.
- Optionally, set the quality slider (the default is usually fine).
- As you adjust the width and the quality of the image you'll see the expected file size of the image update at the bottom left (shown below). Typical course images are usually under 100 KB and banners are usually under 200 KB.

- Select Save to save the resized image to your computer.

Content on this page is licensed under a Creative Commons Attribution-ShareAlike 4.0 International license.
How to Contact the Computer Services Department
Submit a ticket
To submit a ticket, you will be required to log in using your FULL Royal Roads email address (detailed instructions here)
New! If you do not have a full RRU email address (students not currently in a credit program and/or visitors), you can create a portal account using your personal email address.
Email us at IT Customer Service
Contact Form
Phone: 250-391-2659 Toll Free: 1-866-808-5429
Come visit us in the Sequoia Building
Hours of Operation