How to Generate Automatic Live Captions
- Jason 1keddie
These instructions explain how to automatically generate live captions (text of the audio content) of audio playing on your computer for free.
These instructions will discuss two different solutions for generating live captions. The first solution will use a feature built into Google Chrome and the second solution will use a web service called Web Captioner.
Solution #1 is very easy to enable but will only caption audio in Google Chrome. This will include any audio playing in Chrome including embedded videos, Zoom sessions if you connect via browser, and you can even drag'n'drop video files onto Chrome. We recommend that you try this solution first to see if it meets your needs.
Solution #2 can caption audio/video playing from any program on your computer, but it's much more complicated to set up and involves changing the behaviour of how the sound settings work in Windows.
Solution #1: How to generate automatic live captions using Google Chrome
Requirement: Google Chrome web browser
You must be using Chrome version 89+ (version 89 was released in March, 2021).
This solution should work for any audio that is played through the Chrome browser. This works with Zoom as long as you connect via the Chrome browser and not the application. You can even drag video files onto Chrome and they will usually play with captions.
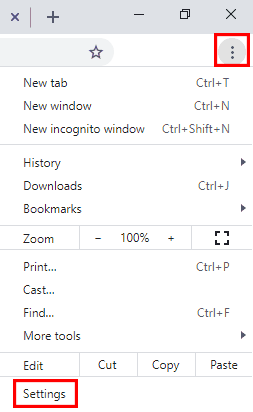
Select the customize button at the top right (button with the three dots) and select Settings near the bottom of the drop-down menu.
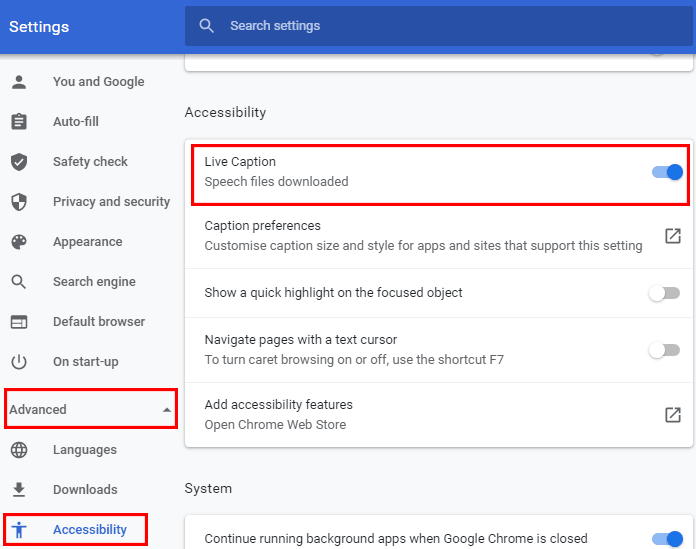
On the left, expand Advanced and select Accessibility.
Select the Live Caption toggle to enable it.
Done!
Most web pages with speech audio in Chrome will now display automatically generated live captions at the bottom. If you have a video or audio file you can usually drag it onto Chrome and Chrome will play the file and display captions (doesn't work with all video formats).
If you'd like to disable this captioning feature in Chrome, return to the Accessibility section in Settings and disable Live Caption.
Solution #2: How to generate automatic live captioning using Web Captioner
Requirements
- Windows (the instructions don't cover macOS at the moment, but the combination of VB-Cable and Web Captioner do work there)
- Google Chrome web browser (Web Captioner uses Google's speech-to-text service, which is only available in Chrome)
- You must have administrator permissions on your computer and be able to install software on your computer
Overview of the Process
The first step is to install a program called VB-Cable. We use VB-Cable to take your computer audio and turn it onto a virtual microphone. Next we will use a free website, Web Captioner, to listen to the virtual microphone and automatically generate live captions and display them in your web browser. To put this another way, Web Captioner will listen to your computer's audio and automatically caption what it hears. Web Captioner is a website, you will grant permission for Web Captioner to listen to your audio, and once you've closed the browser tab that runs Web Captioner it can no longer listen to your audio (until you re-open it).
Once you've completed this process you will need to manually set your microphone in any program you use (e.g., Zoom) and if you want to change the speakers you're using (e.g., change from desktop speakers to headset) you will need to manually make that change (you may be used to it automatically changing when you plug in a device such as your headphones).
If you don't like the changes and don't wish to continue using live captioning, there are simple instructions at the bottom to essentially turn it off and go back to how things were.
Privacy: When using Web Captioner, audio is sent to Google's speech-to-text service and captions are sent back to the browser. For more info read Web Captioner's privacy page.
Steps
Download VB-CABLE. (if you want more info on what this is you can find it here).
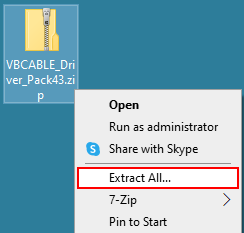
Right click on the VBCABLE_Driver_Pack43.zip file, select Extract all, and select Extract. This will create the folder VBCABLE_Driver_Pack43. You can delete the zip file.
Open the VBCABLE_Driver_Pack43 folder, right click on the file VBCABLE_Setup_x64 and select Run as administrator and grant permissions to make changes if asked.
Note: If you do not see the option Run as administration you do not have administrator permissions on your computer and will not be able to continue.

Select Install Driver. If you get a Windows Security popup, select the Install button.
Once it's done installing, do not reboot the computer. Continue to the next step.
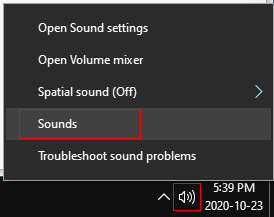
On the Windows taskbar, right-click the Volume button and select Sounds.
You should see the Windows Sound Control Panel (shown below). If the step above didn't work for you (perhaps you don't have the volume button), try this: on your keyboard, press the Windows-key + R-key combination to open the Run box, type mmsys.cpl, and press Enter.
Once you have the Sound Control Panel open, select the Playback tab.
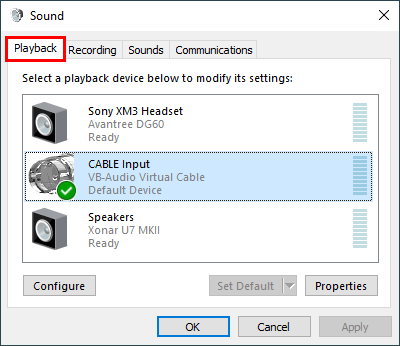
Select CABLE Input and select the Set Default button to make it your default playback device.

Select the Recording tab.
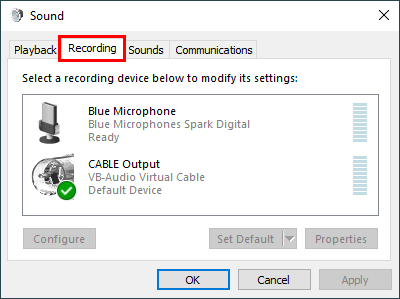
Select CABLE Output and select Set Default. If it is already selected as the default the Set Default button will be greyed out.
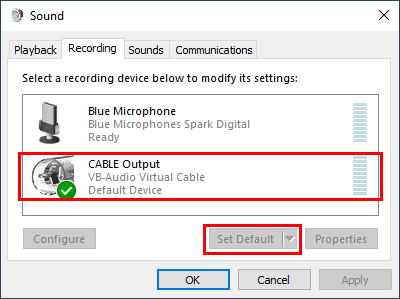
Select CABLE Output and select the Properties button.
- Select the Listen tab.
- Enable Listen to this device.
- Set Playback through this device to the device that you'd like to hear audio on, probably your speakers or headset. Do not set it to the default device or to CABLE In or you will not hear anything.
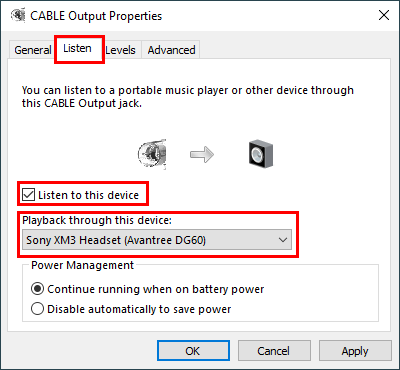
Select the OK button twice to exit the Sound Control Panel.
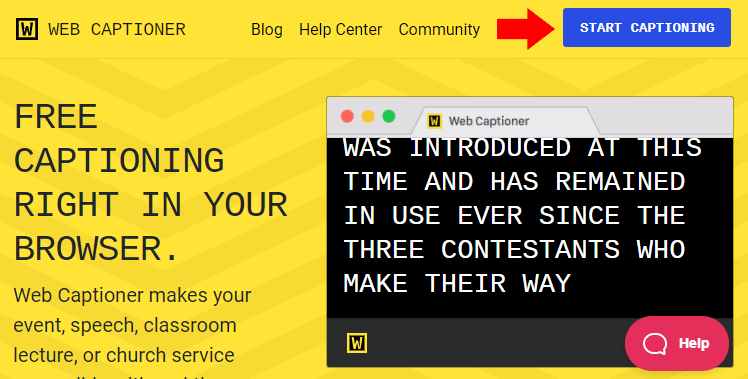
Open your web browser and navigate to webcaptioner.com. At the top right, select the Start Captioning button.
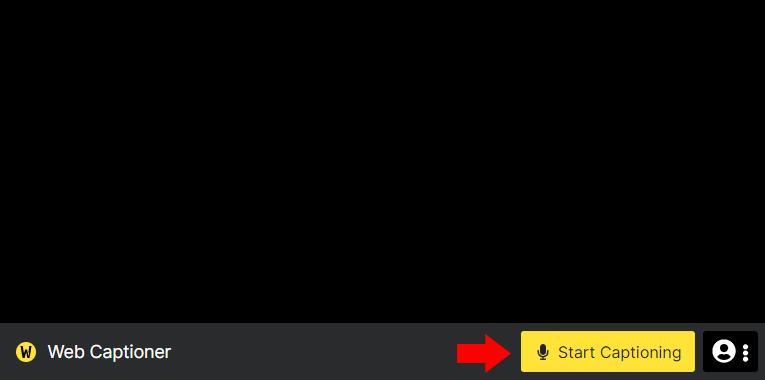
At the bottom right select the Start Captioning button. When Web Captioner asks to use your microphone, grant it permission to do so.
Done!
Web Captioner should now display the captions of any voice audio that is playing on your computer, including a live Zoom session.
At this point Web Captioner should be working. If it's not working refer to the Troubleshooting section below.
Continue reading the following information that is important in understanding how to use Web Captioner and how to manage your Windows audio settings.
Web Captioner: too quiet warning
Web Captioner often displays a "Too Quiet" warning at the bottom. If captioning is working then you can likely ignore this.
Web Captioner settings
On the Web Captioner page at the bottom right is a Settings button. Click Settings once to open the settings menu. In the settings menu you can Save the transcript, Create a new window, or Clear the transcript. If you click on the Settings button in the settings menu you'll see additional settings including some useful keyboard shortcuts at the bottom.
While using VB-Cable, how to adjust volume settings
While using VB-Cable with the above configuration you will not be able to adjust the volume using the Windows master volume control, but you can still control the volume using the volume control in each program (e.g., Zoom or YouTube volume slider).
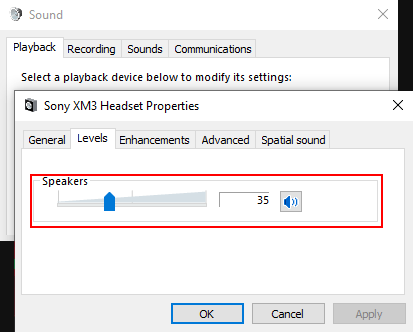
You can also adjust the volume level of your speakers or microphone with the following steps: return to the Sound Control Panel, select the Playback tab, select the device you want to change the volume on, select the Properties button, select the Levels tab, change the volume level to your preference and click OK twice to close the Sound Control Panel.
While using VB-Cable, how to change your audio output device
You want to be able to keep using Web Captioner simply by opening it and pressing the Start Captioning button twice but you also want to switch between audio output devices (e.g. between headphones and speakers).
Steps: Return to the Windows Sound Control Panel. Select the Recording tab, select CABLE Output, select the Properties button, and select the Listen tab. Under Playback through this device, select the device you would like to switch to. Select the OK button twice to exit the Sound Control Panel.
How to stop using VB-Cable and reset your audio settings to how they were before following this guide
Steps: Return to the Windows Sound Control Panel. Under the Playback tab set your preferred speakers or headset to the default. Under the Recording tab select CABLE Output, select the Properties button, select the Listen tab, disable Listen to this device, and select the OK button. While you're still on the Recording tab, set your preferred microphone to the default. Select the OK button to exit the Sound Control Panel.
Web Captioner Troubleshooting
Captioning is working but captioning quality is poor
Although Web Captioner works well in general, it will not be able to accurately caption all voice audio. Captioning works best if
- People speak at a regular pace or slower (not too quickly)
- People speak clearly
- People speak with a good quality microphone. And if they're transmitting their audio live over the internet then they should also have a good quality internet connection and avoid using wireless.
- There is no background music or noise or it's as quiet as possible.
Web Captioner isn't working at all (nothing is being captioned)
- Reboot the computer and try it again.
- If you want to caption a specific program's audio (e.g., Zoom), ensure that the audio output device for that program is set to CABLE Input and that the volume in the program isn't muted.

Content on this page is licensed under a Creative Commons Attribution-ShareAlike 4.0 International license.
Related Articles
How to Contact the Computer Services Department
Submit a ticket
To submit a ticket, you will be required to log in using your FULL Royal Roads email address (detailed instructions here)
New! If you do not have a full RRU email address (students not currently in a credit program and/or visitors), you can create a portal account using your personal email address.
Email us at IT Customer Service
Contact Form
Phone: 250-391-2659 Toll Free: 1-866-808-5429
Come visit us in the Sequoia Building
Hours of Operation