Versions Compared
| Version | Old Version 6 | New Version 7 |
|---|---|---|
| Changes made by | ||
| Saved on |
Key
- This line was added.
- This line was removed.
- Formatting was changed.
Topics Covered In This Article
- Add a contact form:
- Divi Builder - Contact Form Module
- Contact Form 7
Please note: Contact Form 7 is only available for students who are enrolled in the MALAT program and have a MALAT WebSpace.
| Anchor | ||||
|---|---|---|---|---|
|
There are two ways to add a contact form to your site. Activate one of these plugins:
- Divi Builder plugin - read how to add the Contact Form module on Elegant Themes' web site, or
- Contact Form 7 plugin - details below.
| Anchor | ||||
|---|---|---|---|---|
|
- From your dashboard, go to Contact → select Add New.
 Image Modified
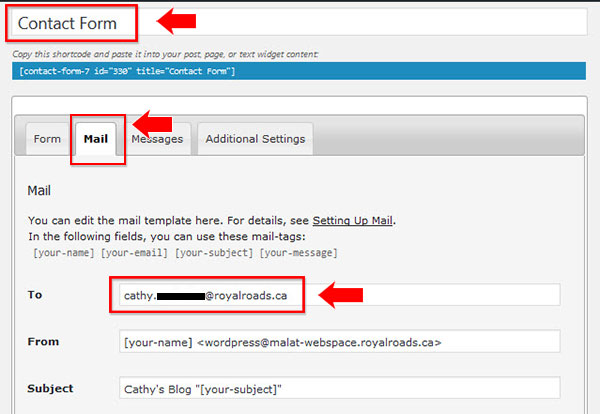
 - Select the Mail tab to edit the settings:
- Untitled - (enter a name for your form, e.g. Contact Form)
- To: (enter in your RRU email address)
- Save
 Image Modified
- Next, near the top of the screen, look for and copy the shortcode:
For example, [contact-form-7 id="330" title="Contact Form"]
 Image Modified
 - Go to your contact page or create a new page, paste your shortcode into the editor:
 Image Modified
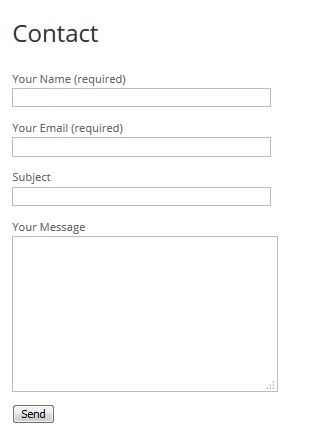
 - Select Publish to save the changes. Click the permalink to view your page. This is how the contact form will look:
 Image Modified
 - Do a test - fill out the form fields and send a test message. Check your email to see if the message was sent out.
Related articles
| Filter by label (Content by label) | ||||||||||||||||||
|---|---|---|---|---|---|---|---|---|---|---|---|---|---|---|---|---|---|---|
|