Topics Covered In This Article
| Table of Contents |
|---|
| maxLevel | 2 |
|---|
| exclude | Topics Covered In This Article|Related Articles |
|---|
|
Editing Content
The Editing function within Moodle allows you to edit content and organize the units and activities within your course. To change or update your course you need to activate the editing mode.
Edit Options
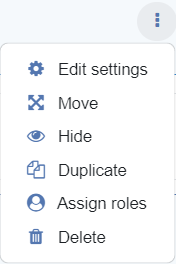
Once you have turned editing on, existing resources and activities will display a vertical ellipsis icon:

If you click in the ellipsis icon you can access the the following options:

- Edit settings - opens the settings window where you can edit the activity or resource.
- Move - a new window will show options to move the activity.
- Hide - this option means that the activity/resource is currently visible to students; choosing it will hide the activity from student view.
- Show - this means the activity is currently hidden from student view; choosing it will make it visible to students.
- Duplicate - choose duplicate to make a copy of the resource/activity. You will be able to edit the duplicated item.
- Assign roles - this option enables you to change the permission of the resource/activity.
- Delete - choosing this option will remove the resource/activity from the course. Note: A warning message will appear when you attempt to delete content.
Question Marks
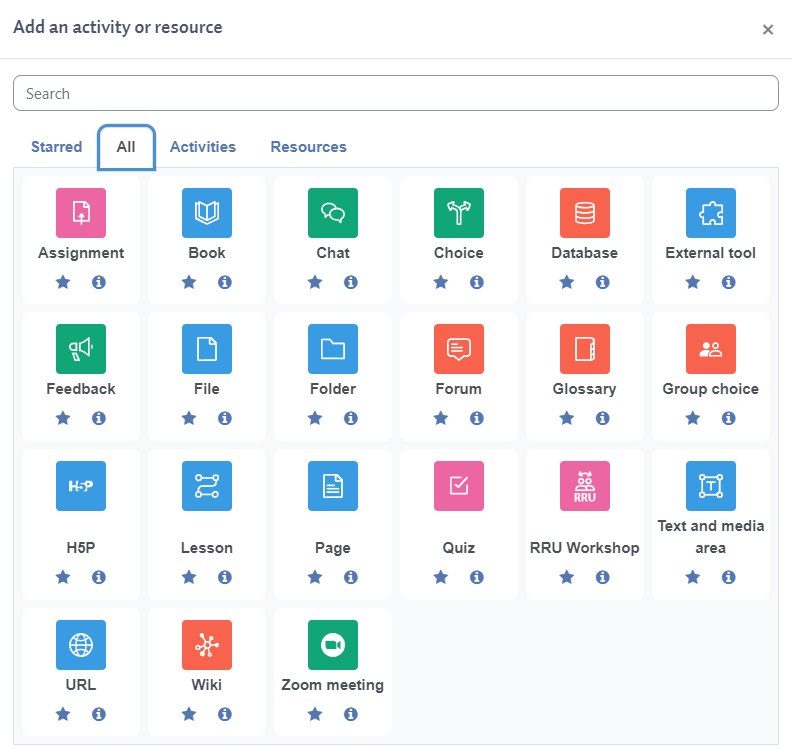
Add an Activity or Resource
At the bottom of the sections/units you can see this selector


Note: Whenever you add a resource or activity to a section, it will appear at the bottom of the section block. To move it, drag and drop it using the/move-handle.png) icon that becomes visible when you hover over the new activity or resource.
icon that becomes visible when you hover over the new activity or resource.
Text Editor
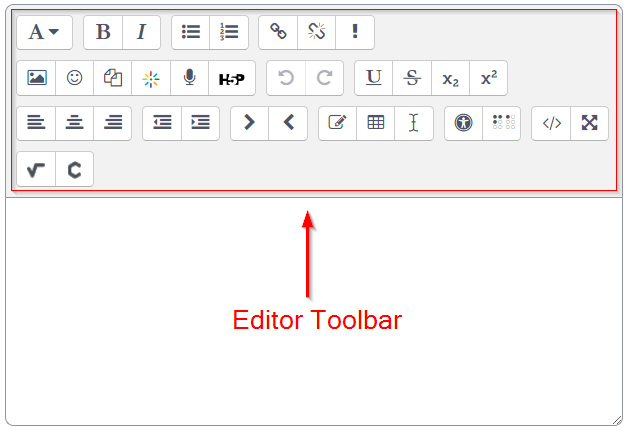
The text editor has many icons to assist the user in entering content.

Many of these icons and functions will be similar to using a word processor. The text editor is used to edit content in resources and activities.
Insert Table
When you click on the insert table button  in the text editor, there will be a number of options to configure when creating a new table. There are at least four basic settings that you will want to consider when creating a table:
Caption: the title of your table
Caption position: where on the table your caption will appear (top or bottom)
Number of columns: The number of columns in the table
Number of rows: The number of rows in the the table

Uploading Files
When you want to upload a file to a resource or activity that accepts file uploads you have the option to use drag and drop or the File picker.Usually the file is copied into Moodle from wherever you have chosen it (e.g., a repository or your computer).


Moving Sections, Activities, and Resources
You can reposition your sections, activities, and resources, by using the move icon next to each. For example, you might move a Forum from week 1 to week 2 or you might move the week 4 section up to week 2.
To begin, you need activate edit mode.

There are
two three methods:
Select and DragMethod 1. Drag and drop.
Steps
- Turn editing edit mode on
- Hover the mouse over the activity or resource you want to move, the mouse pointer will change to
 Image Removed
 Image Added .
 - Click and drag the activity into the new location. You will see an horizontal line indicating the new location.
- Drop the activity in the desired location.
| View file |
|---|
| name | drag-drop-activity.mp4 |
|---|
| height | 250 |
|---|
|
 Image Removed
Click and Select Destination using Menu
Steps
Turn editing on
Steps
Activate edit mode
Click on the
double-arrow ellipsis menu to the
left right of the resource or activity you'd like to move
and , select Move from the dropdown menu, and then select the destination from the
menu screen that appears.
| View file |
|---|
| name | move-through-ellipsis.mp4 |
|---|
|
 Image Removed
| Insert excerpt |
|---|
| Teaching & learning online |
|---|
| Teaching & learning online |
|---|
| nopanel | true |
|---|
|


/question-mark.png) As you navigate around Moodle you will find question marks next to settings and other tools. Click on the question mark to find out more information.
As you navigate around Moodle you will find question marks next to settings and other tools. Click on the question mark to find out more information.
 .
. /move-handle.png) icon that becomes visible when you hover over the new activity or resource.
icon that becomes visible when you hover over the new activity or resource. in the text editor, there will be a number of options to configure when creating a new table. There are at least four basic settings that you will want to consider when creating a table:
 Image Removed
 Image Added .
 Image Removed
 Image Removed


