Below you will find instructions on how to create your own Moodle course site on the Innovate Now RRU Moodle server.
How to add a course/site
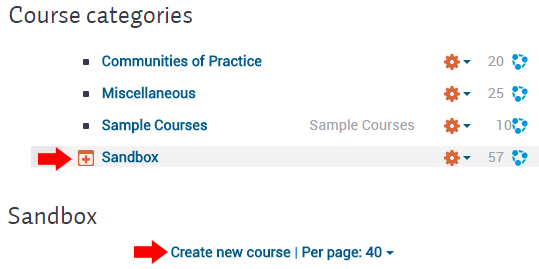
- Navigate to the Manage courses and categories page on the Innovate Now server. Currently, you must do this by clicking on this link.
- Click on the category where you want your course to be.
- Click the Create new course link
- Enter the name of the course and scroll down and click Save Changes, the course settings may be skipped and modified later.
- This will give you a basic 10 unit course/site.
- On the next screen, choose your students/teachers to assign to the course.
How to add participants to your course/site
- Click on Participants in the navigation drawer.
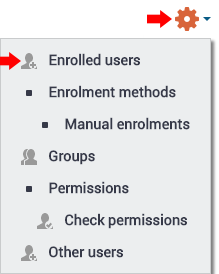
- At the top right, click on the Gear menu and then Enrolled users.
- Click on the Enrol users button at the top right.
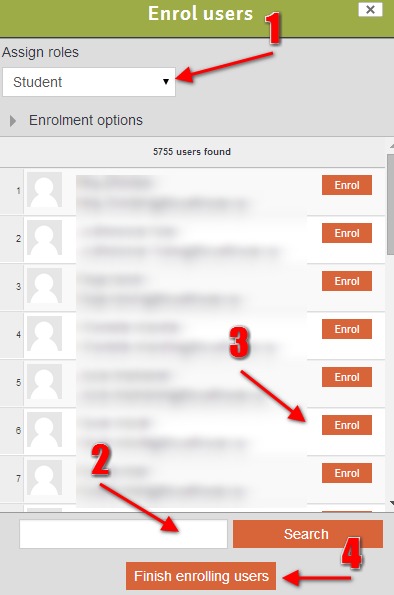
- A pop up screen will appear, use the dropdown menu at the top of the window to Assign Role, search the database for the user, click Enrol>Finished Enrolling
How to backup a course/site
- From the main course page, click on the Gear menu in the top right and click on Backup.
- Initial settings - Select activities, blocks, filters and other items as required then click the Next button. Users with appropriate permissions, such as administrators and managers, can choose whether to include users, anonymize user information, or include user role assignments, user files, comments, user completion details, course logs and grade history in the backup.
- Schema settings - Select/deselect specific items to include in backup, then click the Next button.
- If desired, select specific types of activity to be backed up by clicking the link 'Show type options'
- Confirmation and review - Check that everything is as required, using the Previous button if necessary, otherwise click the 'Perform backup' button
- Complete - Click the Continue button
A backup file (with distinctive .mbz extension to avoid confusion with .zip files) is then saved in the course backup area. Backup file names are of the form backup-moodle2-course-coursename-date-hour.mbz, ending in -nu.mbz when backed up with no users and -an.mbz with anonymized names. You will need to download and save this file prior to the upgrade.
How to restore a course/site
A course backup file (.mbz) may be restored from within any existing course for which you have permission. During the restore process, you will be given the option to restore as a new course or into an existing course.
- Create an empty course/site (see above).
- From the main course page, click on the Gear menu in the top right and click on Restore (if you have an empty course to restore into).
- Upload the backup file or choose a file in the course backup area or user private backup area and click Restore
- Confirm - Check that everything is as required then click the Continue button
- Destination - Choose whether the course should be restored as a new course or into an existing course then click the Continue button
- Settings - Select activities, blocks, filters and possibly other items as required then click the Next button
- Schema - Select/deselect specific items and amend the course name, short name and start date if necessary then click the Next button
- Review - Check that everything is as required, using the Previous button if necessary, then click the 'Perform restore' button
- Complete - Click the continue button
If you require further assistance please contact CTET Studio


